In the dynamic world of wearable technology, the Apple Watch stands out as a pinnacle of innovation and personal connectivity. It seamlessly integrates health tracking, mobile notifications, and a wide array of apps right on your wrist. However, there may come a time when you need to unpair your Apple Watch from your iPhone, whether it’s for troubleshooting purposes, preparing for an upgrade, or transferring ownership. Unpairing an Apple Watch is a straightforward process, yet it involves several steps that are crucial to ensure your data is backed up and that the watch can be set up smoothly by the next user. This comprehensive guide will walk you through the entire process of unpairing your Apple Watch, ensuring you’re well-informed and prepared for whatever comes next.
Understanding the Unpairing Process
Unpairing your Apple Watch from your iPhone does more than just disconnect the two devices. It also triggers a backup of your Apple Watch data to your iPhone, ensuring that you can restore your settings, preferences, and health data on a new Apple Watch without missing a beat. Additionally, the unpairing process removes your Apple Pay information and any other sensitive data from the watch, making it safe to hand over to another person. It’s a critical step in maintaining your digital privacy and security.
Preparing to Unpair
Before you start the unpairing process, there are a few preparatory steps you should take:
- Ensure Both Devices Are Charged: To avoid any interruptions, make sure both your Apple Watch and iPhone are sufficiently charged.
- Keep the Devices Close Together: The unpairing process requires Bluetooth connectivity, so the devices need to be in close proximity throughout the procedure.
- Back Up Your iPhone: While unpairing automatically backs up your Apple Watch data, it’s a good practice to back up your iPhone to iCloud or your computer, ensuring that all your data is secure.
How to Unpair Your Apple Watch
Through the Watch App on Your iPhone
- Open the Watch App: On your iPhone, open the Watch app, which is the control center for all things related to your Apple Watch.
- Access the My Watch Tab: Tap on the “My Watch” tab at the bottom left corner of the screen, where you’ll see a list of all the watches paired to your iPhone.
- Select Your Watch: Choose the watch you wish to unpair by tapping on the “i” icon next to the watch’s name.
- Start the Unpairing Process: Tap on “Unpair Apple Watch” and confirm your decision. If you have a cellular model, you’ll have the option to keep or remove your cellular plan. If you plan to pair your watch with another iPhone, it’s advisable to keep the plan.
- Confirm Your Apple ID: To disable Activation Lock and remove the device from your Apple ID account, you’ll be prompted to enter your Apple ID password.
- Wait for the Backup and Unpairing to Complete: Your iPhone will now back up the latest data from your Apple Watch and begin the unpairing process. Keep the devices close together until you see the confirmation that your Apple Watch has been unpaired.
Directly on the Apple Watch
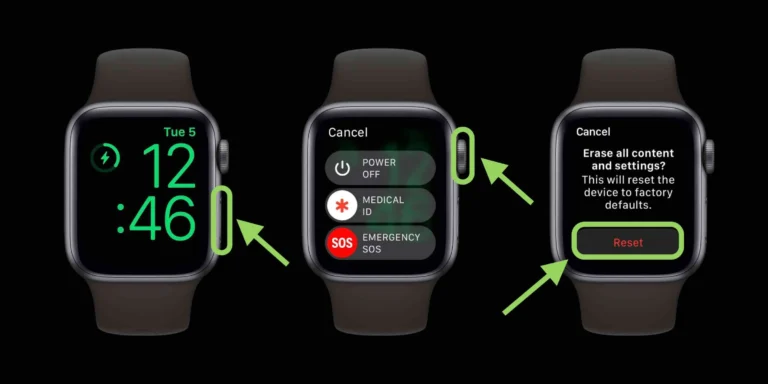
It’s also possible to unpair your Apple Watch directly from the watch itself, which is useful if you don’t have your iPhone available. However, this method doesn’t create a backup of your watch data.
- Open Settings: On your Apple Watch, go to the Settings app.
- General > Reset: Navigate to “General,” scroll down, and tap on “Reset.”
- Erase All Content and Settings: Select “Erase All Content and Settings.” If your watch has a passcode, you’ll need to enter it. Confirm that you want to proceed with the reset.
This method will erase your Apple Watch, removing all data and settings, but it won’t remove Activation Lock. To remove the watch from your Apple ID account and disable Activation Lock, you’ll need to go through the process in the Watch app on your iPhone or via iCloud.com.
After Unpairing
Once the unpairing process is complete, your Apple Watch will restart, and you’ll be greeted with the start-up screen, just like when you first unboxed the watch. At this point, the watch is ready to be set up by a new user or re-paired with the same or a different iPhone.
Tips for a Smooth Transition
- Remember to Pair Again: If you’re unpairing to troubleshoot or upgrade, remember that you’ll need to pair your Apple Watch with an iPhone again to use it to its full potential.
- Check for Updates: After re-pairing, check for any software updates to ensure your Apple Watch is running the latest version of watchOS.
- Restore From Backup: When setting up an Apple Watch after unpairing, you’ll have the option to restore from a backup, allowing you to pick up right where you left off.
Conclusion
Unpairing your Apple Watch from your iPhone is a secure and straightforward process that ensures your personal data is protected while enabling you to transition between devices seamlessly. Whether you’re upgrading to the latest model, troubleshooting, or passing your watch on to someone else, following the steps outlined in this guide will ensure that your unpairing process is smooth and stress-free. With your data backed up and sensitive information cleared, you can confidently take the next step in your journey with Apple Watch.
Read Also: How to Soften Brown Sugar

